Wednesday, December 12, 2012

Clay

For this project, we used air dry clay to make flower bowls inspired by Vincent Van Gogh, and Georgia O'Keeffe. We had a quick slide show learning about their art, then went through the steps of working clay and their tools. We had the option of painting our piece or not. Then, we wrote about what inspired us ,and who.


"The artist who inspired me is Vincent Van Gogh.
He inspired me with his beautiful paintings of
sunflowers." -Amber Couch


Class Display box

Extension Exercise:
I would have students make pinch pots and decorate them
in a Ntive American motif, so that I can incorporate history into the lesson.

Wednesday, December 5, 2012

Crafts

The craft project assignment was to make a spring time picture, using various techniques.  We mixed tempera paint into pastel colors (tints) and used our hands to create bushes or stems.  We then used cup cake tins for flowers. Also, we filled sandwich bags full of primary colored tissue paper and pipe cleaners to make a butterfly.  We then arranged these things in a balanced composition.


Finished Spring Craft Project


Practice  piece

 
Class Display

Extension Activity:
 
I would use this activity along side with a children's book, such as an Eric Carlson book, so that they can depict what may happen next in the story. (Or as a literature project)


Many Different Faces

This project was made from construction paper and
some found objects.  The assignment was to create a 3D mask
using the scoring and curling paper techniques (achieved by using
an xacto knife or scissors). The mask had to have paper going off its edges.
    We also had to write a short paragraph describing our mask.

"Serina the fish loves to swim.
  She lives in the ocean, and is part of a school of fish.
Serina and her school of fish live in a coral reef, and eat sea anemone."


Extension Exercise:
 
 I would use this to teach about the significance of masks in various cultures and what some symbols mean for each culture.

Notan Collage

Notan Collage


For this lesson, we looked at the Notan collage technique, which
emphasises balance and high contrast.  This project used a 10X10 square
of one color, and a 5X5 square of its complimentary or contrasting
color. The assignment was to convey an emotion  using line quality, rectilinear
and curvilinear lines.  Then, the student was to write three or more line poem describing
the emotion they were to convey.


My Notan Example: Confusion
" 'Round and 'round my thoughts go
In which direction, I don't know
Where they'll stop time will show
Where exactly my thought roam."


Class Display of Notan Project
Extension Activity:   I would use this technique to teach children about Matisse and how he used paper to create collages,


Sandpaper Print Making

For this project, we used crayons and sandpaper to create multiple images.
We sketched a design with crayon on paper, then drew the final design
Top: sandpaper.  Bottom: print


Class Display of Project


on a square of sandpaper, pushing hard.
Then we used an iron to melt the crayon onto paper,
creating multiple images.


 Extension Activity:

I would use this activity to go along
with an art history lesson, about
 Toulouse Lautrec's print making.

Illustrating Gestures

In this activity, we used transparencies to
draw the expressions of our classmate's
face to create a short story. We used these
transparencies as templates to trace
onto paper with a crayon (with the use
of a light table, or window).
We then used complimentary colors
to create a background, and wrote a short story.
                                              
                                                              Finished gestural drawing
"Miss lady noticed a strange smell.  She went and looked for it.  Miss Lady found it. It was her brother's gym bag."


Class Project Board
                                                  

Extension Activity:
I would have students draw a tree or some nature scene out side, and then have them
try to color it in complimentary colors, making sure to incorporate high contrast.

Silhouette Art


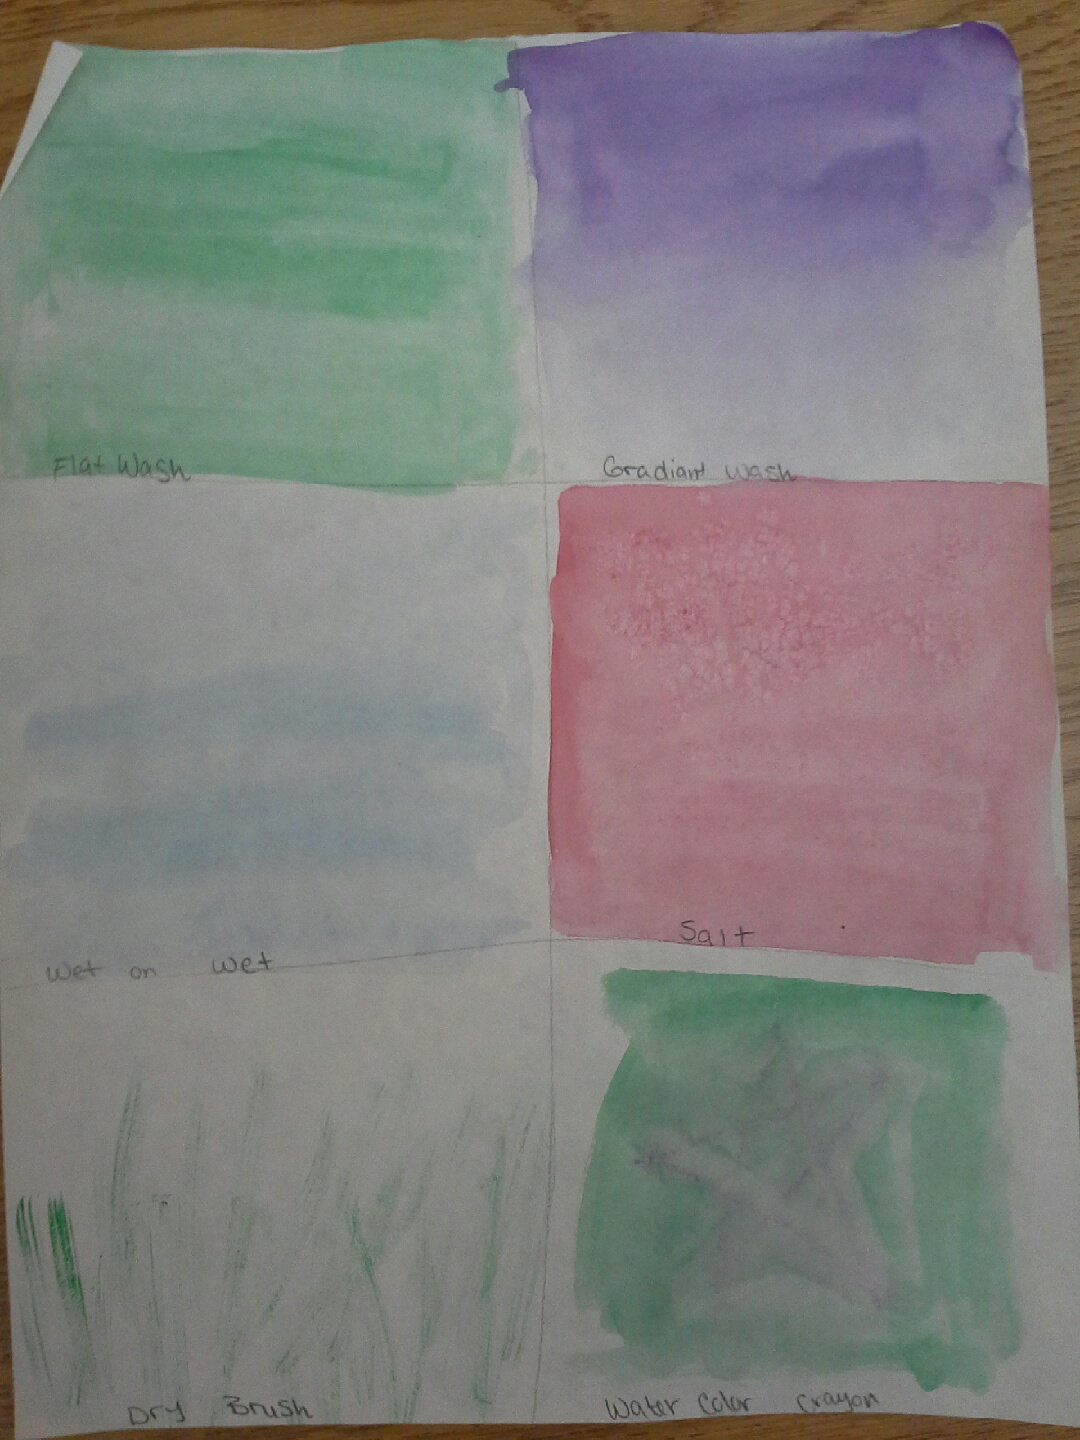
This activity used water color techniques to create a background, and construction paper to make a middle and foreground. The lesson taught different brush and texture techniques, which were helpful in making a background. We then cut out silhouettes to create the middle and foreground. 


Brush and Texture Techniques
 
                                                    My finished silhouette composition
 
 
The Class Project Board


Extension Activity:
I would have students cut out a silhouette of
themselves or of a historic figure and paint
a background of what they may
have seen to inspire them into action.

Tuesday, December 4, 2012

Hidden Safari

This project uses warm colors to hide a cool color design with in it.
First you would draw a design in sky blue color pencil, then draw  repetitive designs over it with warm colors, such as yellow, red, and orange. 
 You have to make sure you don't draw too hard with the sky blue pencil, otherwise the design will show through.
Next, we cut out a frame of glasses from construction paper, then taped red cellophane on them to make some glasses, or goggles. When you look at your design through the red paper, the red cellophane will drown out all the warm colors, and your cool color design will pop out.

Extension Activity:

I would have the students write a short poem to describe an object or picture, and then have the students try to guess what it is. The answer would be the hidden design.

Sunday, October 28, 2012

Eric Carl Inspired Project

We were shown a video based on the famous children's book author Eric Carl. 
The short video was an interview about his life, creative and inspirational
process for his art. It covered his methods on creating paper, which he used various
colors of paint on tissue papers, and the different tools he used to make the textures.
Also, it covered how he went about making his collages, and the childhood inspirations
for his books. Our assignment was to use his methods to create our own story book page(s), and to included a back round, middle ground, foreground .
We started out by painting different textures with PRIMARY COLORS, and mixing them to make SECONDARY COLORS. We used a variety of methods to create texture on multiple papers, using acrylic paint mixed with a little bit of wall paper paste.
 Next, we drew out our design patterns on white paper.
Next, we cut out our shapes using the white paper design as a template, but didn't glue it  until we get the desired pattern down.
When I assembled and glued all the pieces, I chose a few sentences to tell my
story, and ended up with my finished project.

"Even when things get bad...they will get better."
Some extension exercises for this project would be
1) Language arts: promotes creative writing
2) Art: Perhaps as a Graphic design or poster for advertising
3)History: tell a story form the perspective of a famous person
4)Science: tell a story about the life cycle of an organism.

Thursday, October 11, 2012

Art History Inspired Project

Art History Inspired Project


For this weeks project, our Arts Methods Professor introduced us to Vincent Van Gogh, and the history of his life and work.  We were introduced to his childhood, his family, inspirations and then his career.
        Also, she gave us some fascinating facts about his life, such as how he cut off his own ear, and spent some time in an insane asylum. We learned how he hadn't started his painting career until his late twenties, and how he died in his late thirties.


       To help understand and remember his work, we did two master studies of Starry Night, in different ways.
      The first one was a tissue paper and varnish collage on construction paper, were we used our own creativity to create a starry night of our own. After the varnished tissue paper dried, we used another piece of construction paper to cut out a silhouette of our ideal city.  We then decorated with metallic sharpie and oil pastels. I think it was very fun and interesting. I think it is a great project to inspire students to really make some wonderful things, appreciate Van Gogh's work. 

Tissue Paper, Tempera Varnish,metallic sharpie, oil pastels.


The other project we did was a simple, but very fun finger painting.  The assignment was to use the same techniques that Van Gogh used for his starry night.  We didn't have to do a master study, just had to show foreground, middle ground, and background.  We used a waxed paper, and  primary colored tempura paint. After tapping the paper down, we used our fingers to select the colors we wanted, and mixed right on the wax paper. Another stipulation was we needed to incorporate some sort of element from the original, such as the line pattern.  It was very fun; somewhat messy, but very enjoyable. Very liberating to just get messy for a change. I chose to do a study of Starry Night, and was actually pleased with the out  come, given the limited pallet I was given.
 
 
An extension exercise I would use these for would be a project like "soul of the artist", where I would have my students bring in an old shoe, and paint it with the same techniques the artist they choose, or I had presented. I would have them include one recognizable art work on one side of the shoe, and then two aspects of their lives, such as what inspired them, or a major incident or tribulation they went through. 


Thursday, October 4, 2012

Elements and Principles of Art/Design


   For this weeks assignment, our Art Methods professor sent us on a 'scavenger hunt' with a digital camera, to find the elements of art, and make a presentation for my grade level that I wish to teach.  Being an artist, I got excited and set out with my digital camera, and then sifted through some I had taken the previous summer, on a trip home to California. I struggled a bit with the power point (I haven't had a chance to play with the program in some time) but eventually caught on and had a great time making my presentation.  I chose to make an eighth grade level, since I am striving to become either a junior high or high school art teacher. I tried to explain the concepts as simply as possible, while still keeping to their actual meaning. I feel proud of my presentation. Here are some of the pictures I chose to present, for each element:
 
Line:
 Here you can see were it would start (as a point- the beginning of the blue corner) ,and even where the contour lines can be found (the curvy line)
 
Main St. Aberdeen, SD (10/12)
 
 
Texture:
Here I chose a picture of tree bark, because its nooks and crannies created great shape, making it look rough. I took this one at Melgard Park, Aberdeen, SD. (10/2012)
 
 
Color : Value
This photo was taken over the summer when I visited California. I chose it because I though it was a great example for showing not only Value, but Hue and Shade as well. (5/2012)
 
Color :  Warm and Cool
Here, you can see the warm and cool colors, and the Primary, Secondary, and Tertiary colors (this is one of my original painting ) (10/2012)
 
 
Emphasis :
 This one I had taken on the outskirts of Aberdeen, SD during the summer.
The blurry back round creats great negative space for the more focused area of the bird.(5/2012)


Thursday, September 27, 2012

"Dot Day" Celebration & Exploration


      Our arts methods Professor showed  our class an interesting animation based off a book by Peter H. Raynold's, called "The Dot" . A celebrated children's book, Raynold's story
was made into a short animation. This animation was an enduring story about a young student who felt she couldn't draw, so wouldn't try. The teacher cleverly encouraged  the student by framing her "dot". She felt she could do better, and eventually surprised herself with the amazing things she could do with "a dot."

     In celebration of "International Dot Day", we students as a group
engaged in many different ways to "make our own dots" in a class mural.
We started out with each of us having a cup of a primary color
tempera paint, and was given complete artistic freedom with that
color. She played music while we painted, and when it stopped, we
moved to another section where a previous student was painting.
We were encouraged to mix and blend the colors, and over lap our designs to see not only the results of the color blending, but also what we thought would add to the design.
Once we were back in out original spot, we stopped and let the mural dry. We then
cut out our dots.

Our Class Mural
 
. Our Arts methods Professor then introduced us to several different methods of creating a dot, and encouraged us to explore with the media the different things we could do. It was extremely fun to play with all the media, and discover what they could do. We had to have at least four, but we weren't limited on what they could be, and were encouraged to try some methods not presented by the Professor as well.
 
    I liked the sun catcher project, where baby oil is used on construction paper to make it transparent. The oil pastels used on the project helped created a bit of a resist, and the oil helped blend them with a cotton swab. You had to be careful not to smudge the pastel too much, unless that was what you were going for, since it moved well with the baby oil.


      I also really enjoyed the project where crayons were used as a resist to water color paints on paper. The use of different colored crayons under the water colors gave a striking contrast to the soft colors of the paint, and gave a nice texture. You can see where the paint seeped through the wax where you drew lightly, and how it just rolled off where you pressed harder. It had a nice affect.
Water Color and Crayon Resist
   
The coffee filter project was very fun as well. I have never considered putting water color paint on them, and was amazed at the pretty result. Putting it on a can of spray paint to dry in a bowl shape, we used spray starch to turn it into a hardened bowl. It was a very nice idea. They came out beautifully. The only thing to remember is that they can get very wet with the water colors, and that you should put a paper towel under the can the filter is drying on, to prevent messes.
 
coffee filter and water color starched


We were even given a certificate stating that we participated in "International Dot day". 


We also as a class put up all of our art experiments  in a class display.

 
Here's my display


     I myself decided to try my hand at using acrylic paints to make my own "dots". I had a lot of fun layering and moving the paint around. It was very therapeutic, just using colors without any real purpose other than to swirl it around, with no real reasoning.

An extension exercise I would use this for, would be to use it to teach color use in a class room. Another, would be to challenge students to use just a circle in a composition, to convey a mood or idea with nothing but color, and the shapes. A non-artistic extension exercise, I would use this project in mathematics, by having the children explore with the projects, then find the diameter or radius of the circles they have created.

My dot painting
 
 
Other dot (made of clay)


Thursday, September 20, 2012

Foot Print Project (^-^)

For my first project, I was given the task of describing everything that I have done, or that has influenced me, in a visual way. So, thinking upon this, I was given the idea of doing a foot print, and putting in it the things that describe, and have made me, well, me.

Given this great idea, I traced then cut out my foot print on construction paper.  I found the things that I felt represented me, and put them inside of it. I made sure they were important things, things that described my core interests and personality.
Here are the steps in which I took to make "my foot print":

Step 1:    Think about what makes, or has made you who you are  
               today. 
    This should include the major influence of childhood through adult hood. It's  an    introduction to who you are.  They should be your most important parts of your life. Be sure to include your name!

Step 2:   Trace and cut out your foot, or shoe print.
      If you have small feet, you can use both if need be. Doesn't matter if it's your left or right foot.

Step 3  Use 3 or more different media to represent yourself.
         
            You can use ink, paint, crayons, fabric...endless media. But a minimum of 3 so you learn about the uses of the different media.

           This activity would be useful to use in a teaching environment, because it not only encourages a child to really think about themselves, but what makes them special. It can promote self-esteem, allow shyer students to express themselves, and gives you, as the teacher, a valuable incite about what your student's interests and life is like. It can be a valuable tool to use in figuring
out how to teach not only the students as a group, but the individuals as well. It can lead to a better understanding about how to teach your students, in accordance to their types of learning.

An extension exercise this would be useful for, would be to ask how their summer vacation went, or their proudest moment. This type of project would have many uses and benefits.
                                                                  (^o^)  (^v^) (^-^)